Wednesday, September 29, 2010

Blueberry Buckle

Some of my wedding gifts included recipe books. Recipe books that hold all sorts of yummy, tasty, delicious treats. In one of these wonderful books, I have already discovered a "Dave's Fave."  That recipe came from this book...


I've made this coffee cake a couple times already and David loves it for his breakfast through the work week.  One recipe lasts the entire week perfectly...that is, if you don't have a slice for dessert at dinner one or two nights like we have...  The recipe also states that you can use raspberries, which I'm definitely going to try the next time raspberry season comes around.  In fact, most "berries" would probably turn out pretty well with this recipe.

Try it, try it, try it!  OK, I'll stop chanting now...but, it is really good.

Blueberry Buckle

2 cups all-purpose flour
2 1/2 teaspoons baking powder
1/4 teaspoon salt

1/2 cup shortening
3/4 cup sugar
1 egg
1/2 cup milk

2 cups fresh or frozen blueberries

1/2 cup all-purpose flour
1/2 cup sugar
1/2 teaspoon ground cinnamon
1/4 cup butter

Preheat oven to 350 degrees.  Grease the bottom and 1/2 inch up the sides of a 9x9x2-inch or 8x8x2-inch baking pan (with Pam); set aside. 

In a medium bowl combine the 2 cups flour, baking powder and salt; set aside.

In a medium mixing bowl beat shortening with an electric mixer on medium speed for 30 seconds.  Add the 3/4 cup sugar.  Beat on medium to high speed until light and fluffy.  Add egg; beat well.  Alternately add flour mixture and milk to beaten egg mixture, beating until smooth after each addition.

Spoon batter into prepared pan.  Sprinkle with blueberries. 

In another bowl combine the 1/2 cup flour, the 1/2 cup sugar, and cinnamon.  Using a pastry blender, cut in butter until mixture resembles coarse crumbs; sprinkle over blueberries.  Bake for 50 to 60 minutes or until golden.

Cool slightly; serve warm.

408 calories, 17g total fat (6g saturated fat), 38mg cholesterol, 247mg sodium, 58g carbohydrates, 2g fiber, 5g protein

Monday, September 27, 2010

PB & J

This past weekend was a whirlwind for me considering I had birthday after birthday after birthday to celebrate!  Just to give you an idea, this past week (within a two day period) was my dad's, grandmother's, niece's and mother-in-law's birthday.  And that's just the tip of the iceberg! 

On Saturday morning was Abbey's sixth birthday party.  Abbey is my friend (and matron of honor) Susan's daughter and for her party there were sandwiches served.  One of the sandwich flavors was the good ol' PB&J.  The night before the party Susan and Amanda (my maid of honor) prepared all the sandwiches for the following day.  They did this so that we had that much less to prepare immediately prior to the arrival of a dozen hyper little girls...

I was not informed of what took place during this preparation time until the following evening, when the three of us were enjoying some cold beverages.  Apparently, Amanda prepares PB&J sandwiches differently than either Susan or myself.  Now, I know there's more than one way to skin a cat (pardon the Southern saying), but how do you make a PB&J?

Here are the three ways we discussed that are all acceptable ways for PB&J preparation...or are they?? 

A.  Spread peanut butter on one slice of bread.  Spread jelly on another slice of bread.  Place peanut buttered slice on top of jellied slice (not the other way because the jelly might slide off bread as your flipping depending on consistency of jelly).

B. Spread peanut butter on one slice of bread.  Spread jelly on top of peanut butter.  Place bare slice of bread on top of peanut butter and jelly-covered slice.

C. Get out a bowl and spoon.  Dump some peanut butter in bowl.  Dump some jelly in bowl with peanut butter and stir.  Spread PB&B mixutre on a slice of bread.  Cover with another slice of bread.

I'll go ahead and share that my normal protocol is option A...that's probably why it's option A, because it's the first one I thought of. 

Thoughts?  Do you have an even more interesting or efficient way to make a PB&J?

By the way, yes, this is what late 20s/early 30s women talk about on a Saturday night.  What of it?  ::wink::

Wednesday, September 22, 2010

Angelology

I started this book on Thursday the 9th...and by the time I had join my book club this past Friday night, I had read just over half of this book, which has a total of 452 pages.  Then, when I got up on Saturday I read...and read...and read...and read some more.  I finished the rest of this book within 36 hours.  With that being said, obviously this is one of those books that once you get "into it" you have to finish it. 

The basis for the storyline in this novel is a couple of scriptures from the Bible. Twice within the Bible the "Nephilim" are referred to and Angelology takes these pieces of scriptures and runs with them...and weaves them into a very captivating plot. 

The Nephilim are supposedly the offspring of fallen angels who have mated with human women.  These Nephilim are a "master race," which when the term is loosely translated means "giant."  They are taller, more beautiful, stronger and live longer than the typical human.  Not only that, they're unfeeling, emotionless and mean with a desire to rule the world.  They have no regard for human life and murder people regularly.  Angelologists (in this book only-there are real angelologists, but they don't have the same functions as within this book) are humans that study angels and the Nephilim trying to stop the Nephilim from their "evil ways" including taking over the world. 

Now, knowing that small bit of background information...Evangeline is really who this book is about, but you don't really "get" that until the end of the book.  The story starts with her and finishes with her.  You learn about how she joins the convent she belongs to in the beginning of the novel and how her life is a calm day-to-day schedule of prayer and church duty.  Then, a young gentlemen, named Verlaine, shows up with an inquiry about the contents of her library and Evangeline's life is turned upside down.  Angelology is a part of Evangeline before she even knows it...and that's only the beginning. 

This book has a very intricate storyline with a lot of background information that you receive up until about 2/3 of the way through the novel.  And then you get to the guts of the book...and then you can't put it down.  I will say there were a couple of twists and turns that I kinda saw coming, but not to their full extent.  There was definitely a few instances within this book that my jaw simply dropped open.  I loved it and would definitely recommend this book!

Tuesday, September 21, 2010

Basic Pizza Crust and BBQ Chicken Pizza

I had clipped/saved these two recipes a while back, but just haven't had a chance to get to them.  And I needed to because homemade pizza is wonderful. 

Another reason, though?  When I moved in with David there were four bottles of BBQ sauce in the fridge.  One bottle has since been used up, but when I made this pizza there were still three.  Three half empty BBQ sauce bottles.  In my fridge.  Taking up space.  Can you tell this grinded on my nerves?  I only had one bottle that I contributed.  Why did David have three bottles?  Maybe he feels like a different flavor from time to time?  They were all different brands...  I don't know.  Regardless, this recipe has helped me dwindle that number down to two bottles.  Two because I made this pizza twice.  What?  The crust recipe makes two crusts.  And it was a good pizza.  So I made it twice.  Yum.

I printed both of these recipes off the Pioneer Woman website...big shocker there, I know.  And have I mentioned that David's mother prefers the PW pizza crust to her own?  Wow.  I had to try it...soon.

Let's begin with the crust...

Basic Pizza Crust
(PW Version)

1 teaspoon instant or active dry yeast (I used active)1 1/2 cup warm water
4 cups all-purpose flour
1 teaspoon salt
1/3 cup olive oil

Sprinkle yeast over 1 1/2 cups warm (not lukewarm) water. Let stand for a few minutes.

In a mixer, combine flour and salt. With the mixer running on low speed (with bread hook attachment), drizzle in olive oil until combined with flour. Next, pour in yeast/water mixture and mix until just combined.  The dough will come together in a sticky mass.

Coat a separate mixing bowl with a light drizzle of olive oil, and form the dough into a ball. Toss to coat dough in olive oil, then cover the bowl tightly with plastic wrap and set it aside for 1 to 2 hours, or store in the fridge until you need it.

Note: it's best to make the dough at least 24 hours in advance, and 3 or 4 days is even better.  (I made my dough and baked the first pizza 2 days after making the dough, then the second pizza exactly a week later.  Both crusts came out perfectly!)

When you are ready to make the pizza, grab HALF the pizza dough (recipe makes 2 crusts) and squeeze the dough toward the bottom to form a nice, tight, pulled ball. You can roll out the pizza with a rolling pin if you'd like, but sometimes it's just as easy to throw it around and pull and stretch till it feels right. And when the crust is nice and thin, lay it on an oiled baking sheet or pizza pan (I spread mine on a round pizza stone). Drizzle a little olive oil on the dough and spread it with your fingers. Very lightly sprinkle some salt on the crust.
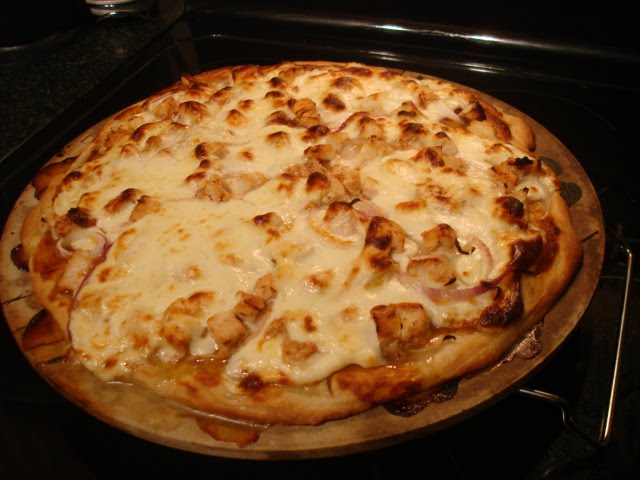
BBQ Chicken Pizza
(slightly altered from the PW original)

1/2 recipe for pizza crust (half of recipe listed above)
2 whole boneless, skinless chicken breasts (I used 6 tenderloins the first go-around)
approximately 1/2 cup BBQ sauce
olive oil
salt
approximately 16 ounces, weight fresh Mozzarella cheese, sliced thinly
1/2 red onion, sliced very thin

Preheat oven to 375 degrees.

Salt chicken breasts on both sides, then place in an ovenproof dish. Pour BBQ sauce over the breasts and turn them over to coat. Bake for 20 to 25 minutes, or until chicken is done.

While chicken is baking, stretch out pizza crust. Lay it on a pizza stone drizzled with olive oil. Drizzle a little olive oil on the crust.

Spoon a couple of tablespoons of BBQ sauce on the crust and spread it evenly. Top sauce with half the sliced mozzarella. Sprinkle on thinly sliced red onion.


Remove chicken from oven.  Increase oven temperature to 500 degrees.

Dice the chicken into small cubes.


Top pizza with the cubed chicken, then the rest of the sliced mozzarella.


Bake for 15 to 17 minutes, or until crust is golden brown and toppings are bubbly.


Remove from the oven and let sit for 5 minutes.  Cut into slices and serve immediately.  Enjoy!

Monday, September 20, 2010

The Lost Symbol

I have now officially read all of Dan Brown's Robert Langdon stories.  Honestly, I can't wait for them to make this one into a movie.  It wasn't my favorite of the lot, in fact if I had to rank them accordingly I would say The Da Vinci Code, The Lost Symbol and then Angels and Demons.  At the same time, I think that with the storyline of this book with it's visual aspects, which can't be always easily translated into printed form...this story will come alive on the silver screen, much like The Da Vinci Code did.  I thought they did an exceptional job with that book to movie transition, I only hope they do the same with The Lost Symbol.

This story begins with Robert Langdon being called to Washington D.C. by his good friend and mentor, Peter Solomon...well, Solomon's assistant made the call, but regardless Langdon leaves quickly.  What Langdon discovers once he gets to Washington is that Solomon did NOT request his presence, rather it was Solomon's captor Mal'akh. The story continues into an interesting web of betrayal, murder, torture, destruction and finally...the truth.  The truth about Mal'akh and the truth about The Word.

The book is signature Dan Brown and if you've enjoyed his mystery-style with a Biblical twist in the past, then this is right up your alley.  I really enjoyed it and can't wait for it to come out in the theaters...I've done a little research online this morning and it appears that the movie will come out in the summer of 2012.  Keep your fingers crossed!

Monday, September 13, 2010

Mozzarella Stuffed Meatballs

What's a good comforting meal for a Saturday night when it's been a lazy, relaxing day?  Spaghetti and meatballs sounds good doesn't it?  I'll bet it sounds even better when the meatballs are made from scratch! 

Well, I'll bet you can't guess what we had for dinner on Saturday night...

I found this recipe on the Tasty Kitchen website a while back.  It looked really good at the time, so I clipped it and filed it away for future use.  Months later I've now tried it...though, I did change it up a bit.  Here's a link to the original recipe I found...and another link to the blog it came from, Your Everyday Momma.

Here's what I did with this recipe...

Mozzarella Stuffed Meatballs

1 pound ground beef
¾ cups Italian bread crumbs
2 teaspoons salt
⅛ teaspoons pepper
1 teaspoon Worcestershire Sauce
1 whole egg
½ cups milk
1/4 cup parsley
mozzarella cheese, sliced and chopped

Mix the bread crumbs, salt, pepper, Worcestershire sauce, egg, milk, and parsley in a small mixing bowl. Add to the ground beef until well incorporated.  Using a metal spoon (preferably one you use to scoop cookie dough), scoop out mixture in the size of the meatballs you’d prefer. Before forming into a ball, place a small amount of mozzarella cheese in the middle and form the ball around so that all of the cheese is completely covered.  Brown the meatballs until almost completely cooked, place the meatballs on a jellyroll pan, and bake for 8-10 minutes at 350 degrees.

Serve with your favorite pasta and tomato sauce!


These meatballs are extremely filling!  David normally goes back for seconds when I make spaghetti and meatballs, but not with these babies!  After just one serving he'd had enough...try these out, they're taaaaaaaaaaasty!

Thursday, September 9, 2010

Thrown Together Enchiladas

Do you ever just throw together some ingredients and call it dinner?  Of course you do...everyone does!  Well, I did this for last night's dinner and it was a home run according to David.  Hey, I'm always glad to hear that!

Have I mentioned that I'm a rock climber?  In case I haven't...well, I am.  Here's a pic of me from a few weeks ago.  I'm back on the wall for the first time after my return from my honeymoon.


You're probably wondering why I'm mentioning this...  Well, I climb two evenings every week and many times this leaves David to "fend for himself."  I usually try to cook so that there's leftovers on these nights, but it doesn't always work out that way.  If there's no leftovers sometime he's a cranky husband...

So, what I did for last night's dinner was I slapped it together on Tuesday night and left him baking instructions for when he got home from work.  This worked out swimmingly because he didn't turn into a cranky, hungry husband and the meal was still warm when I got home to eat!  Not only that, David told me these were the best enchiladas I've made to-date and asked me if this was a new recipe.  I just looked at him and said, "Uhhh...no, I just slapped together some items in the fridge that needed to be used up before they went bad."  When I tried these, I have to say they were quite good.  I would definitely recommend making these enchiladas or some very similar out of what you can find in your own fridge and pantry as well!

Thrown Together Enchiladas

6 chicken tenderloins (approximately 2-3 breasts)
1 can enchilada sauce
1 can green chilis
4 oz. sour cream (half of an 8 oz. container)
shredded cheddar cheese (approximately 1 1/2 cups)
1 cup salsa (I had home-made, but you can use whatever)
jalapeno cheddar tortillas wraps

Boil chicken tenderloins until no longer pink in center.  Shred chicken with forks in a medium bowl.

Mix into chicken bowl green chilis, sour cream, approximately 1/2 cup of cheddar cheese, salsa and 1/3 can of enchilada sauce.

Spray square baking pan (8x8 or 9x9) with cooking oil AKA Pam.  Spread approximately four tortillas with filling mixture, then roll each tortilla and place in baking pan.  If there is leftover filling mixture, spread over top of enchiladas evenly.  Pour the rest of the enchilada sauce evenly over enchiladas making sure all surfaces of the tortillas are covered.  Sprinkle remaining cheddar cheese over enchiladas.

*At this point I refrigerated my enchiladas overnight until David was ready to bake them, giving the filling mixture and toppings time to soak into each other and meld in flavors.  But, if you want to just pop this pan in the oven immediately, feel free to do so!

Bake at 400 degrees for 15-20 minutes.  Sauce and cheese topping should be melted and bubbly.

Enjoy!

P.S. The jalapeno cheddar tortillas give the enchiladas a nice, spicy kick.

Sorry there are no pics...I didn't expect for this meal to have such a good review or make it to the blog!

Wednesday, September 8, 2010

Chocolate Oatmeal No-Bake Cookies

Remember waaaay back last week when I said I would share my two recipes that I made for our church potluck?  Well, I didn't get around to sharing the second one last week, but I am ready to share now. 

This is just one of those simple recipes that everyone has in their repertoire...with minor differences here and there.  But, it's a crowd pleaser! 

I found this recipe on Cooks.com because for some weird reason I couldn't find a copy in my stack o' recipes...weird, huh?  Well, after I went ahead and MADE the recipe I, of course, found my copy in my book.  The reason I couldn't find my copy was because it's a recipe my mom gave me...which my grandmother gave her...and it's not called "Chocolate Oatmeal No-Bake Cookies."  It's called "World War II" cookies.  Hmmm...interesting. 

After gobbling down these cookies along with other church-goers, now David is requesting them again this week.  I'll try the "World War II" cookies recipe when I fulfill his request, just to see if there's a significant difference that makes them tastier.  In the meantime, enjoy this particular version of this popular recipe.

Chocolate Oatmeal No-Bake Cookies

2 cups sugar
1/2 cup cocoa
1 stick butter
1/2 cup milk
1 tsp. vanilla
3 cups quick-cooking oatmeal
1/2 cup peanut butter

Combine sugar, cocoa, butter and milk in a saucepan. On medium heat, bring to a boil for one full minute.

Remove from heat. Stir in peanut butter (optional), vanilla and oatmeal.

Drop by spoonful onto wax paper. Let cool for at least 30 minutes.

Can you tell I ran out of wax paper?

Wednesday, September 1, 2010

Angels & Demons


I just recently finished Angels & Demons.  This book was written prior to The Da Vinci Code (2000 vs. 2003), though I'm not sure if it just didn't get as much attention when it was published because the movies were released in reverse order.  Regardless, I wanted to read this novel after enjoying The Da Vinci Code.  Plus, I like to come full circle with books that have an ongoing plot-line with the same characters.

In a nutshell, the novel is about Robert Langdon and Vittoria Vetra attempting to keep a secret society, the Illuminati, from destroying Vatican City...during a papal conclave.  That really was a short blurb, ha!

I will say that I enjoyed this book, though probably not as much as The Da Vinci Code...and I don't know if that's because I saw the movie first or not.  There's a twist in the end and because I knew the twist was coming...  Who knows.  I liked it and if you haven't read it or seen the movie I would definitely recommend it.  But, also definitely read The Da Vinci Code!  And as always, both books are better than the movies...but, we always know that's how that goes...

Now I'm on to read The Lost Symbol, the final book in this series...or at least for now.  I'm not sure if there's going to be another...anyone know?

LinkWithin

Related Posts with Thumbnails